Welcome!!!

As my blog name suggests, this blog will be like a learning journal. I won't go step by step on each dessert on what to do, but instead focus on the technique(s) I was learning and what I discovered while in the process of making it. I hope you will learn a thing or two, or if anything, use this as a reference and get ideas for your dessert-making. Happy decorating!
Showing posts with label Rice Krispies. Show all posts

Thursday, April 26, 2012

Pinewood Derby Cakes

All cakes-8" vanilla round cake, buttercream frosting
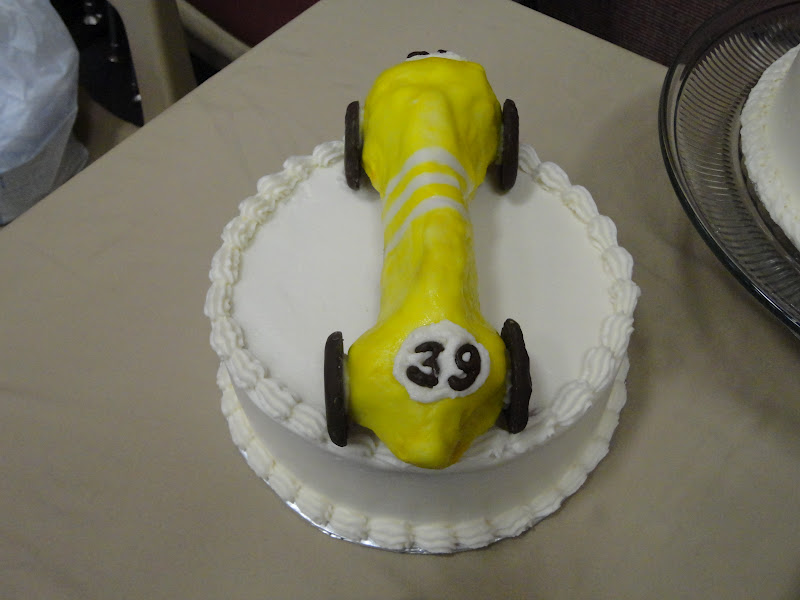
Cars-Rice Krispies treats, rolled buttercream frosting, buttercream frosting, food coloring, melting chocolate, Oreo cookies, skewers for supports

Techniques Used-rope border, shell border, reverse shell border, painting

Focus-the CARS!!!

My husband is cub master and last month was the pinewood derby.  He asked me to do something that would feed 60 people.  The first idea that popped into my mind was making car models, but have them stacked like they do in the Olympics-first place is tallest and in the middle, then second and third follow on the sides.  I was going to make little trophies too, but we decided that it would probably be best if we just made car models, like you would see in a car show or dealership.  We didn't want the winners to think the prize was the car and/or the cake! 

While I was working on smoothing the cakes, my husband worked on shaping the cars with Rice Krispies treats.  Then he smoothed a thin layer of buttercream frosting to smooth out the Krispies and put them in the fridge, to let the buttercream harden a little before putting on the layer of rolled buttercream. 

My husband had to go to work so I took over.  I wanted the cars to have stripes, so I rolled out some of the left-over rolled buttercream, cut it into strips, and then placed them on the cars.  I then watered down a little bit of the food color gel and started painting.  Once I finished painting, I would then take off the strips and put them in the fridge.  The only complaint I had with this method was that the color never seemed to dry, so if they touched each other, the colors would rub off on each other.  With the little bit of rolled buttercream left-over, I think I will try kneading the color into it and see if the same thing occurs. 

 
Here are close-ups of each of the different cars:


As I mentioned before, the focus was on the cars, but I also had some borders that I wanted to focus on.  I wanted to see if I could do the reverse shell border as fast as the decorator in this video.  I'm happy to say that it was quite a success, although I think the other cake decorator still would pipe circles around me : ).  I wanted to show a close-up view of the border because I was so proud of how it turned out.


I also focused on the rope border.  Usually, top borders sit on top of the cake, and I think this border looks so much better coming from the side and ending on the top.  I don't know if you can tell with this picture, but the effect I was looking for worked.  I didn't really have a focus for the last cake, so it was mainly trying to make the shell look uniform (see yellow car pictures above).


The numbers were made from melting chocolate.  I strongly advise that you make extra numbers just in case they break.  Also, make sure that the numbers have some thickness to them or they will be more prone to break or melt in your hand.  What I did was trace the number on top of itself 2-4 times so it was at least 1/8" thick.  You don't want your numbers to be really flat.  This would work for thick or thin fonts.  One more thing, when choosing a font, rounder fonts are better than pointy or sharp edged fonts.  The wheels were Oreo Fudge Cremes cookies.  I was planning on getting chocolate filled Oreo cookies, but they didn't have them, so I used these ones instead.  Any chocolate cookie would work though.

These cakes were decorated March 2012.

Thursday, August 11, 2011

Independence Day Treats

Rice Krispies treats cut with cookie cutters, buttercream frosting

Focus-having fun trying out different borders and techniques

I was itching to decorate something and I thought it would be fun to decorate rice krispies treats for Independence Day.  For one thing, rice krispies treats are easy to make and clean up, and they also can be cut with cookie cutters pretty easily.  I used plastic cookie cutters, but any kind will most likely work.  I wanted to try out a few different borders and things so I will list the techniques used with each picture.


Red, White and Blue Basketweave Star

Techniques Used-basketweave

There isn't much to say about the star except that I think it turned out nicely.  I would've used a star tip for the red if I had one available, but it still looks good using a round tip.  I didn't use a basketweave tip for this star.


Blue Firework and White Star

Techniques Used-star, dot, E-motion border

For the Fireworks, I used one tip only.  To get the different sizes of stars, I changed the pressure.  Next time, I will try to just do one size to see what effect that gives.  By the way, I think the cookie cutter shape may be called "Blue Ribbon."  It wasn't part of the Independence Day set.  For the star, I did an E-motion border in white and then added blue and red stars for color. 


Braided Star

Techniques Used-star, braid, Fleur de lis

This was the one I was most excited to try, the reason being that I wanted to try out the braid as a border.  I hadn't seen that in any of my decorating books, so thought it might not be a common border.  I'm glad with how it turned out.  The Fleur de lis is in the middle.   To make a Fleur de lis, you start with a shell down the middle.  Then you do a reverse shell on both sides of the shell.  Pretty simple, yet elegant. 


Reverse Shell and White Flower Star

Techniques Used-reverse shell border, star flower

I like the look of the reverse shell, but I think the hardest part for me is remembering which way to go.  I saw a YouTube video where the decorator was doing it really fast, and I thought I would try to do it fast too.  It didn't work out in certain areas, but she did an amazing job on her cake.


United States Flag, White Stars

Techniques Used-star, dot, writing, Fleur de lis

Next time, I think I will spread red frosting and then pipe white stripes.  These didn't turn out as well as I would've liked.  Part of it was that the rice krispies treats formed to the plate after, so the flagpole was originally straight.  Also, I was piping the red frosting the way I would for writing (slightly above the treat) when I needed to pipe directly onto the treat.  Live and learn, right?  The two white stars are just a bunch of stars and then dots on the corners. 


Cowboy boots, Red and Blue Stars

Techniques Used-piping, star, dot, shell

The cowboy boots were fun to do.  I learned from the flag that I needed to pipe closer to the treat than with writing.  Also, when I cut out the boots, I used the same cutter, but flipped it over to make the second shoe.  Both stars use shells.  The difference is that the red one uses two little shells for each point, while the blue one uses one. 


Braided Cowboy Hat, Blue Star, Fireworks

Techniques Used-braid border, star, zigzag/shell border, dot

I thought the braid would look good on a hat, plus I wanted to try the braid border again.  The blue star is something I thought I saw on a video, but I can't find the video anymore.  It's just a shell with a slight side-to-side movement.  I think it had a nice effect, adding texture to a simple star.


Another USA Flag, Rope Border Cowboy Hat

Techniques Used-rope border, star, writing, dot

I've already discussed how to make these, but I thought you would like a closer picture of these as well.  I think this flag looks much better, even with the bent flagpole.

These Rice Krispies Treats were decorated July 2011.