Welcome!!!

As my blog name suggests, this blog will be like a learning journal. I won't go step by step on each dessert on what to do, but instead focus on the technique(s) I was learning and what I discovered while in the process of making it. I hope you will learn a thing or two, or if anything, use this as a reference and get ideas for your dessert-making. Happy decorating!
Showing posts with label flowers. Show all posts

Friday, August 16, 2013

Blue Flower Bouquet Diaper Cake

diapers (size 1), string, 6" cake pan, ribbon, tissue paper (blue and green), gift card
 
Focus-tissue paper flowers and wrap
 
Here's where this diaper cake idea started.  This diaper cake was for a mom of five, so I wasn't sure what she would need.  I figured one can't go wrong with giving diapers and gift cards!  I didn't want to just hand her a bag of diapers, so I started looking around YouTube for a creative way to wrap them.  I don't remember how, but I stumbled across this site and liked the look of the "vase".  Obviously, I used diapers instead of toilet paper rolls.  I then used this site for the tissue paper flowers.  Again, here's the link to the diaper stacking site.  For the flowers, I added leaves by cutting small rectangles, folding them in the middle (like you would for gift bags) so that all the corners are close together, and then taping each to the back of a flower.  The gift card was taped to a skewer, but I suggest getting the skewer through the diaper cake first.
 
This diaper cake was decorated June 2012.

Monday, July 15, 2013

Purple Flower Diaper Cake


diapers (size 1), string, cake pans (6", 8", 10"), ribbon, tissue paper (white, purple, and green)
 
Focus-overall design of the cake
 
Before I start, I'm sorry it's been a while since I last posted.  I have some more cakes to post, but they are mainly diaper cakes, mostly because diapers were more appreciated during that period of time than cake.  With this cake, I wanted to again try my hand at decorating this diaper cake as if it were a wedding cake.  I used the stacking diapers technique from this site again.  I find it works well, and I really don't want to roll up a bunch of diapers.  The tissue paper flower instructions are from this site.  Obviously, my flowers aren't the same size as Emma's, but to get my size, I just folded one tissue paper in half over and over until I got the size I wanted (about 3"x5", but whatever size is fine) and then cut on the folds.  I think I only used 4 or 5 pieces of tissue paper per flower. 
 
This diaper cake was decorated August 2012.

Tuesday, May 22, 2012

Diaper Cake

silk flowers, ribbon, hair clips, lots of diapers (size NB, 1 or 2), string, cake pans (6", 8", 10", 14")

Focus-the whole process, but mostly playing with the design

I wanted to add this to the blog, even though it's not a dessert.  The nice thing about doing a diaper cake is you're spending most of your time on the design, not baking and frosting the cakes.  You're also not tempted to eat all the frosting : ). 

I decided to do 4 tiers because I had lots of diapers and flowers to play with.  I learned how to stack the diapers from this site.  I thought it was a great idea to use cake pans, so that you get uniform round cakes and the walls of the pans help with keeping it upright.  I chose to use size 1 diapers because most babies will be in size 1 much longer than Newborn.  It doesn't matter as much if you're doing a smaller cake.  This cake used about 135 diapers!

This cake was for a girl, so I decided to make flower hair clips for the decorations.  Not all the flowers are hair clips, but there are quite a few (yellow daisies, white and purple roses, purple carnation to name a few). 

Something I learned from this project is that less is more. I tried adding more ribbon and flowers and it looked way too busy. Also, if you're using flowers, adding some green leaves makes the cake look even better. It may be because the colors I used were pastel colors.


This diaper cake was decorated May 2012.

Saturday, April 7, 2012

Orchid Cake

8" round cherry cake (from a box), buttercream frosting

Techniques Used- spatula striping, rosette border, orchid flower

Focus-orchid flowers

I've been looking forward to making this cake for a while.  I saw a video on how to make these flowers, and they looked so easy, yet beautiful!  Needless to say, it took a lot of practice to get the flower to look the way I wanted.  I had to think really long and narrow.  Once I got the hang of it, a flower took 1-2 minutes. 


I also wanted to try having two different colors of frosting for the body of the cake; the top of the cake is white while the side of the cake is purple.  I thought this would be a good time to try this because I wanted there to be contrast for the edges of the flowers, but I didn't want the whole cake to end up white, looking washed out.  I smoothed the top of the cake first, and then did the side.  The top border can cover any mixing of frosting colors.  If you smoothed the side of the cake first, it would be harder to hide the mixed frosting, because the mixed frosting would show on the side instead of the top.

Lastly, I was very happy with how the rosette border turned out.  I learned that when releasing at the end, you have to still go sideways instead of upward.  I don't know if that makes any sense, but if you look at the difference between the white rosettes and the purple rosettes, I think you'll see the difference.  Both borders look fine, but the white ones end going outward (or away from the rosette), while the purple ones look more like a circle because the ends are sideways (or into the rosette).  Also, make the size of the circle big enough so you almost see a hole in the center.


This cake was decorated February 2012.

Monday, March 12, 2012

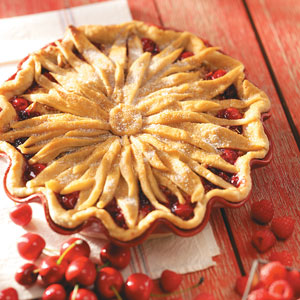
Flower Lattice Apple Pie

9" apple pie, pie crust flower

Techniques Used-lattice top, fondant/gum paste Lily

Focus-making fondant/gum paste Lily out of pie crust
 
 
I wanted to know if the flowers made with fondant or gum paste could also be made with pie crust.  I think the hardest part about it was making a form for the oven.  There are plastic formers out there made by Wilton and other companies, but I needed to bake the flower, and the former wouldn't be able to handle the heat.  All I did was take a strip of aluminum foil and mold and shape it to be a ring the size I wanted.  I didn't take a picture of it, but you can see it underneath the flower.

I cut out six petals; they look like stretched tear drops.  I then thinned out the edges of the petals to make them look more realistic (this also makes the edges brown slightly for a neat effect).  Here's a video of how I thinned the edges, although the video is about making an anemone.  I then made a line on each petal using a veining tool.  Next I started placing the petals.  As you can see, there are two layers of three petals, so I just divided the ring in thirds for the bottom layer, and then placed the next layer of petals in the spaces.  I didn't want the tips of the petals to just droop down, so I made aluminum foil balls to lift them.  The picture above shows some of the petals pointing upward.  Then it's just baking it and placing it on your pie. 

I wanted to show you the pie without the flower.  I really like this design, how it gives the pie some texture without adding more pie crust.  If anything, there is less pie crust, or at least that's how I do it.  I like the strips to be fairly separated, but the strips can vary by size and distance between them. 
 
 
For those of you that want to learn this technique, I found some videos and written instructions for you to follow.  This first video is the way that I do it, except my pie recipe doesn't require egg whites.  Here are written instructions with pictures as well.  I also wanted to show this video, because it's another way to do the lattice top, so you can choose which way you prefer.  I also like it that he cuts his own strips without using a ruler, and they look really nice. 
 
 
Here are some more ideas for the tops of pies.  This first site shows a few different borders as well as the lattice top.  The second site is more focused on borders, but also shows pie pops, which are pies on a stick.  I hope this has gotten your creative juices flowing, or at least gotten you to crave some pie!
 
 
This pie was decorated January 2012.

Wednesday, August 31, 2011

Flower Power Cake

9" White and Funfetti round, Buttercream frosting

Techniques Used-basketweave, rope border, carnation, Wilton rose, swirl star flower, rosebud, vines

Focus-letting someone else design and try out some techniques

While visiting family, my sister wanted to decorate a cake.  I asked her to make a design and then we figured out the finer details.  It turned out pretty much how she designed it, except that we had to change out daffodils for yellow carnations.  On the sides, the front half has vines and little flowers.  The back half is just basketweave.

 It was neat to see how the cake developed.  We started off with making flowers.  The flowers were mainly done by me, but that was mostly because I messed up the batch of frosting, so it was harder to manage.  I put more butter than shortening, and there was more powdered sugar than needed.  Anyway, all it did really was make the frosting more sensitive to temperature than usual, and it was also stiffer than usual.  I also discovered that I don't like how the flowers look when using flower formers. I think the formers are more for apple blossoms and daisies. 

After the flowers, we prepared the cake for decorating.  Part of the design was to have the casually smooth top in the front.  Since an assortment of flowers would be towards the back, we didn't need to casually smooth the entire top.  My sister did the basketweave, and I think she did a pretty good job.

After that, my sister did a rope border on the top and bottom and then we assorted the flowers on top.  We went through a surprising number of batches of frosting.  I think altogether I made 12 cups.  All of it didn't end up on the cake, partly because the frosting was so good that other family members couldn't stop eating it, and it was also the plan to make cupcakes, but we didn't get that far.  What's funny is the rope borders are blue and purple because we ran out of white, so we thought we'd better use up some of the other frosting. 

Next in line was adding the vines.  Once those were in place, we added little pink rosebuds, blue swirl star flowers, and a couple yellow and purple carnations to the vines.  Then there were leaves and the cake was finished. 

This cake was decorated July 2011.

Friday, June 17, 2011

Sweet Pea Cake


8" round yellow cake, buttercream frosting

Techniques Used-sweet pea flower, shell border, leaves

Focus-sweet pea border

In one of my Wilton books, there is this cake that uses the sweet pea flower for the borders as well as on the sides.  Although this is nothing like the picture in the book, I wanted to try out the sweet pea border.  I chose to do this cake because I only wanted to use one batch of frosting (3 cups).  This flower uses very little frosting, covers quite a bit of space, and makes a unique border. 


Since I was trying to stay within 3 cups of frosting, I had to determine the colors I wanted beforehand.  First off, having the cake frosted white meant that whatever frosting was left over could be used for the design.  I didn't measure it, but I think there was 1/2-3/4 cups of frosting left over.  (On a side note, I didn't fill as much between the layers as I normally do, so a good estimate for frosting an 8"x4" round is 2 1/2-3 cups of frosting.)  Secondly, with the flowers being blue, I could add yellow to the frosting once I was done with piping the flowers or vice versa.  I was able to make my goal and had about 1/4-3/8 cups of frosting to spare.

This cake was decorated June 2011.

Wednesday, June 15, 2011

Majestic Roses II


8" round chocolate cake, buttercream and chocolate buttercream frosting, peanut butter fudge filling

Techniques Used-Wilton rose, shell border, leaves

I've done this cake before, but this one is slightly different.  There are two roses in the middle this time, and I used tip 47 for the shell border, instead of the usual tip 21.  I did this because I use that tip for the vertical chocolate lines and I thought it would add uniformity to use the same tip.  I learned with this cake that frosting consistency really matters.  For example, the roses call for stiff consistency, but if it's too stiff (which is my tendency) then the edges of the petals won't be smooth, and they also take longer to pipe out the frosting.  I used to think that roses were a pain because of how long they took.  I think this time I made 20 in about 70 minutes, which I know isn't as fast as professionals, but it's much faster than what I was doing before.

This cake was decorated May 2011.
Tuesday, June 7, 2011

Sunshine Flourishes Cake

8" round vanilla cake, buttercream frosting

Techniques Used-carnations, ruffles, shell border, leaves

Focus-carnations, ruffles

I got this cake idea from The Wilton School Decorating Cakes-A Reference & Idea Book. The cake in the book had ridges from a decorating comb, but unfortunately, I didn't make the frosting thin enough. Also, the ruffle is with a bigger tip (Tip 127D), but the local craft stores didn't carry the tip needed. If you plan on doing this cake, I would see about ordering the tip online.

I think carnations are easier flowers to make than roses, and more unique from flower to flower as well.  You can probably find pictures or videos online, but it's basically a bunch of zigzag motions over a mound of frosting.

The ruffle was easier than I expected.  Granted, it may be harder with a larger tip.  I ended up using tip 125, a larger size of a rose tip (104).  I practiced the ruffle on the bottom of a plate many times before doing it on the real thing.  I focused on keeping the wide end of the tip on the cake and then moving the pointed end up and down. 

This cake was decorated May 2011.

Tuesday, March 15, 2011

Sunflower Cupcakes

chocolate cupcakes, chocolate frosting, buttercream frosting, mini chocolate chips (or regular as shown above)

A friend and I worked on these (there were about 2 dozen) and although they are simple, we learned that the consistency of the frosting is really important.  If it is too thick, then the petals won't make a point.  To thin frosting, add between 1/2 a tsp. and a tsp. of water to a cup of frosting, and keep doing this until you get the right consistency.  By the way, we used freezer Ziploc bags to hold the frosting.  Sandwich bags aren't strong enough to handle the pressure. 

These cupcakes were decorated June 2009.

Thursday, February 24, 2011

Flowers and Vines Cake


1/2 sheet vanilla cake, buttercream frosting

Techniques Used-star flower, vines, star border

Focus-vines

I made this cake in 2009, about six months after I started to decorate cakes, and I wanted to try making a vine design, but nothing too elaborate.  Since I didn't have anything to write on the top, this design separates the negative space into four smaller sections, making the cake seem less plain. 

This cake was decorated August 2009.

Rose and Swirl Flower Basketweave Cake

7 1/2" oval spice cake, apple filling, and white buttercream frosting

Techniques used-basketweave, Wilton rose, swirl flower, leaves, rope border

There wasn't a focus on this cake.  I actually only made the roses and flowers of this cake, but I still wanted to post this cake because it's something I can do, and I like the flower arrangement. 

This cake was decorated April 2009.

Flower Pie


 I discovered this neat idea when I was trying to find pie crust cutters on the internet.  I searched on Google images, and the second picture above is what I discovered.  The first picture is what I concocted, but I think I would do a few things differently the next time I try this.  For one thing, only use thin strips on top, and another thing, have a smaller center.  If you would like to see this and other yummy treats she's made, visit
 
This pie was decorated January 2011.

Saturday, October 30, 2010

Garden Party Cake


8" White Cake, buttercream frosting

Techniques Used-swirl star flowers, leaves

Focus-swirl star flowers

This cake idea was in my Wilton Cake Course 1 book, but I don't think it's in print anymore.  When taking the cake class, I found that I really liked doing these flowers.  That's why I decided to try this cake out.  The difficulty with this cake was arranging the flowers, because they were delicate.  I should mention that I made all the flowers first on wax paper a couple days ahead of time.  Anyway, I'm happy with how the cake turned out.

This cake was decorated March 2009.

Roses, Flowers, and Dots Cake


8" round vanilla cake, buttercream frosting, blackberry filling

Techniques Used-Wilton rose, swirl star flower, dots, leaves, shell border

Focus-brush striping

I've always loved the two-tone flowers.  I thought blue would be such a neat color, because it's a color rarely seen in nature, and I wanted a lot of contrast with the white.  Also, I wanted to use a color that tasted good, so red and purple were out of the question.  By the way, there is a shell border underneath the swirl star flowers and leaves, so that they would have something to attach onto.  One more thing, the leftover frosting I had from the roses, I used on the cake, because I made the roses a couple of days ahead, so I mixed the remaining frosting with other white frosting to make this blue color, so there was very little frosting wasted. 

Brush Striping Materials-small brush (used only for food), food gel, frosting, disposable bag, tip

Brush Striping Directions-I'm not really going to go into directions, because I think Wilton does a good enough job and they have pictures of what they're doing.  You can probably find a video on the Internet as well.  However, I will give you some of my tips:
-Use more food gel than you think you need. 
-for roses, make sure the second color is aiming for the pointed part of the tip.
-Do practice roses without the second color.  Once you feel comfortable with making roses, then add the second color.

This cake was decorated May 2009.

Sunday, October 24, 2010

Sweet Peas and Star Flowers Cake


First Tier-10" vanilla round cake, buttercream frosting
Second Tier-8" chocolate round cake, buttercream frosting

Techniques Used-sweet pea flowers, star flowers, leaves, vines,

Focus-two tier cake

I knew that with a tiered cake, each tier can't just be place on top of each other without any support, but I wanted some practice with this.  Honestly, the design on the cake wasn't at all what I envisioned, even though I think it still looks nice. 

Tier Cake Materials-4-8 supports per tier (wooden dowels, tapioca/milkshake straws, Wilton supports, etc.)

Tier Cake Directions-Make sure each tier has a plate, foil-wrapped cardboard, or something similar underneath it. 

Take your supports and set them next to the bottom tier for your measurement.  Cut to the length you need, then stick them into the bottom tier.  I only used 4, but if you are starting out with bigger tiers, you may want more support. 

Another note, if you are wanting to make a "topsy turvy" cake, I would recommend watching the Cake Boss episode called "Freaks, Fast Food, & Frightened Frankie" from Season 2.  It shows how to stack the tiers about 9 minutes into the show. 

This cake was decorated September 2009.

Roses, Rosebuds, and Rosettes Cake


8" vanilla round cake, buttercream frosting, apricot filling

Techniques Used-Wilton rose, rosebuds, leaves, rosettes, rope border

Focus-rosebuds, rosettes

I found this design in an older version of Wilton's cake decorating course books, and liked how simple and elegant it looked.  I chose orange for the cake because I hadn't used that color before, nor had I tried mixing colors since starting to decorate cakes.  I think it turned out to be a nice shade of orange, not too bright and not too dull.  The trick is to start out with more yellow dye than red (one horse to one rabbit), and then add a tiny amount of red, if needed. 

I won't go into how to make rosebuds and rosettes because I didn't take pictures of the process, and I think it would be more helpful to have pictures than my description alone.  I know Wilton cake decorating books show how to do these, and I would assume that other cake decorating books would as well.

This cake was decorated October 2009.

Majestic Roses Cake


9" chocolate round cake, buttercream and chocolate buttercream frosting

Techniques Used-Wilton rose, leaves, shell border

I got this cake design from my Wilton Cake Decorating Course 1 book, but unfortunately, I believe it is out of print.  The original design was exactly like this except for one thing-everything was white.  I decided to go with chocolate on white because I thought this same design would look good with the contrast.

This cake was decorated March 2009.