Welcome!!!

As my blog name suggests, this blog will be like a learning journal. I won't go step by step on each dessert on what to do, but instead focus on the technique(s) I was learning and what I discovered while in the process of making it. I hope you will learn a thing or two, or if anything, use this as a reference and get ideas for your dessert-making. Happy decorating!
Showing posts with label rolled buttercream. Show all posts

Thursday, April 26, 2012

Pinewood Derby Cakes

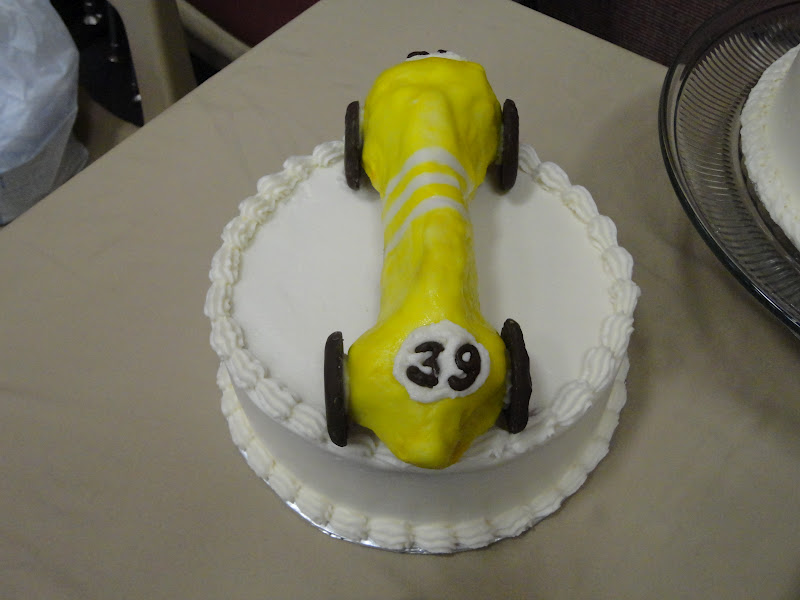
All cakes-8" vanilla round cake, buttercream frosting
Cars-Rice Krispies treats, rolled buttercream frosting, buttercream frosting, food coloring, melting chocolate, Oreo cookies, skewers for supports

Techniques Used-rope border, shell border, reverse shell border, painting

Focus-the CARS!!!

My husband is cub master and last month was the pinewood derby.  He asked me to do something that would feed 60 people.  The first idea that popped into my mind was making car models, but have them stacked like they do in the Olympics-first place is tallest and in the middle, then second and third follow on the sides.  I was going to make little trophies too, but we decided that it would probably be best if we just made car models, like you would see in a car show or dealership.  We didn't want the winners to think the prize was the car and/or the cake! 

While I was working on smoothing the cakes, my husband worked on shaping the cars with Rice Krispies treats.  Then he smoothed a thin layer of buttercream frosting to smooth out the Krispies and put them in the fridge, to let the buttercream harden a little before putting on the layer of rolled buttercream. 

My husband had to go to work so I took over.  I wanted the cars to have stripes, so I rolled out some of the left-over rolled buttercream, cut it into strips, and then placed them on the cars.  I then watered down a little bit of the food color gel and started painting.  Once I finished painting, I would then take off the strips and put them in the fridge.  The only complaint I had with this method was that the color never seemed to dry, so if they touched each other, the colors would rub off on each other.  With the little bit of rolled buttercream left-over, I think I will try kneading the color into it and see if the same thing occurs. 

 
Here are close-ups of each of the different cars:


As I mentioned before, the focus was on the cars, but I also had some borders that I wanted to focus on.  I wanted to see if I could do the reverse shell border as fast as the decorator in this video.  I'm happy to say that it was quite a success, although I think the other cake decorator still would pipe circles around me : ).  I wanted to show a close-up view of the border because I was so proud of how it turned out.


I also focused on the rope border.  Usually, top borders sit on top of the cake, and I think this border looks so much better coming from the side and ending on the top.  I don't know if you can tell with this picture, but the effect I was looking for worked.  I didn't really have a focus for the last cake, so it was mainly trying to make the shell look uniform (see yellow car pictures above).


The numbers were made from melting chocolate.  I strongly advise that you make extra numbers just in case they break.  Also, make sure that the numbers have some thickness to them or they will be more prone to break or melt in your hand.  What I did was trace the number on top of itself 2-4 times so it was at least 1/8" thick.  You don't want your numbers to be really flat.  This would work for thick or thin fonts.  One more thing, when choosing a font, rounder fonts are better than pointy or sharp edged fonts.  The wheels were Oreo Fudge Cremes cookies.  I was planning on getting chocolate filled Oreo cookies, but they didn't have them, so I used these ones instead.  Any chocolate cookie would work though.

These cakes were decorated March 2012.

Monday, September 5, 2011

My First Wedding Cake!

6" round white cake, rolled buttercream, buttercream frosting, raspberry preserves, strawberries
white cupcakes, buttercream frosting, sprinkles, "C" signs

Techniques Used-quilting, balls, dots, rope border, rosettes, rose (sort of Wilton), spatula striping, spiral cupcake

Focus-decorating 300+ cupcakes!

I have now done a wedding cake, and what a great experience!  It was good to work with someone and see what they wanted and then create it.  There was still a lot of stress and things go differently than I imagined, but I enjoyed seeing this cupcake tower come to life. 

Techniques Used-quilting, balls, dots
 
 
I finally figured out how to make the quilting look professional.  Firstly, I made marks at the top and bottom of the sides of the cake, dividing it like I would if I were doing a basketweave (if looking from eagle view, mark North, South, then East, West, then halfway between each, and then halfway between each once more) to make 16 marks for the top and then the bottom.  Secondly, I used a wooden shish kabob to first line up the top and bottom marks, and then make the diagonal impression.  I found that making the impression before the quilting tool was much better, because then I'm just following the line instead of trying to make my own.  The key to making the quilting look nice is to not "eye" things, but to measure everything, like you would with making a quilt.

Technique Used-spiral cupcake using tip 1M

This is a quick and easy design, and looks pretty nice too.

Technique Used-rope border

Once the cupcake has been frosted, the border is very fast.  I learned that if the cupcakes weren't frosted all the way to the edge, then the rope border will make the edge look clean.  This picture is not one of those examples (you can see frosting underneath the rope border).

Technique Used-rosettes

The nice thing about rosettes is you don't have to frost them beforehand as long as the rosettes are slightly overlapped.  I found that frosting each cupcake doubled or tripled the amount of time spent on each cupcake.  With 300 cupcakes, time is a big deal (3 min./cupcake x 300 cupcakes=15 hours).  Using rosettes made a nice texture change from the other cupcakes.

And last, but definitely not least.....
Techniques Used-Wilton rose (sort of), spatula striping
 
 
I really liked how these turned out.  They brought just enough color to the cupcake tower without being to overbearing.  I wanted to mention why I call this spatula striping and not brush striping.  It has to do with what you use for the striping.  In this case, I made red frosting for the striping, so you would most likely use a spatula to stripe the frosting onto your decorating bag.  For brush striping, you would use straight food color gel and use a brush to stripe it onto your decorating bag.  Compare these pictures with a cake I did using brush striping, and you will see the difference. 
 
 
I liked these cupcakes so much that I took more pictures of them.  The lighting is different, so they look like they are more red-orange than red.  I like how each rose is different, just like if you were to find actual roses, no two would be alike. 

I wanted to mention a few more things about the cupcakes.  For one, I bought undecorated cupcakes and buttercream at Sam's Club.  Each case has 150 cupcakes in them, and the buttercream is a 5 gallon bucket (one bucket is enough for at least 300 cupcakes).  It ends up being about $2.50/dozen cupcakes, but I think it's well worth it.  Could you imagine trying to bake 300 cupcakes in a standard oven, or making all the frosting?  Also, if I were to do cupcakes again, I would know that I need 2-3 days to work on them, because it takes a lot of time and energy to decorate all of these cupcakes.  Transporting them is also a big problem, because I don't have a good way to package them.  I made the rose cupcakes at my home, and a handful of them got damaged along the way.  Right now, it is more realistic to transport a finished tiered cake than finished cupcakes.

This cupcake tower was decorated September 2011.

Monday, August 29, 2011

Wedding Cake Trial

6" white round cake, rolled buttercream frosting, buttercream frosting, raspberry filling

Techniques Used-balls, dots, quilting

Focus-working with rolled buttercream frosting

This is my very first wedding cake.  The bride wanted a cupcake tower with a 6" round on top.  I decided to do a trial cake because I was using rolled buttercream, something I haven't used before.  It is like fondant except using ingredients more like buttercream.  I haven't tasted a fondant frosting that I liked so this seemed like a great alternative to get the fondant look, but not the taste.  It's more oily than buttercream, but I put a little bit of powdered sugar on top to make it look less shiny.

I learned quite a few things while doing this cake.  Firstly, there needs to be a buttercream crumb coat on the sides.  This is so that the rolled buttercream will lay flat (if you look at the sides, you can see the buttercream dips in slightly where cake layers meet). 

Secondly, I need to figure out a better way to do the quilting technique.  As you see in this second picture, it looks different from the first picture.  The diamonds are bigger in this picture.  I thought I was going the same angle the entire time, but when I got to the end there was significantly more space left at the bottom than at the top.  I think I can fix this by looking at it at eye level instead of looking down.  Also, I will go more slowly so that I can change mistakes and have less to fix.

This cake was decorated August 2011.