Welcome!!!

As my blog name suggests, this blog will be like a learning journal. I won't go step by step on each dessert on what to do, but instead focus on the technique(s) I was learning and what I discovered while in the process of making it. I hope you will learn a thing or two, or if anything, use this as a reference and get ideas for your dessert-making. Happy decorating!
Showing posts with label shell border. Show all posts

Thursday, April 26, 2012

Pinewood Derby Cakes

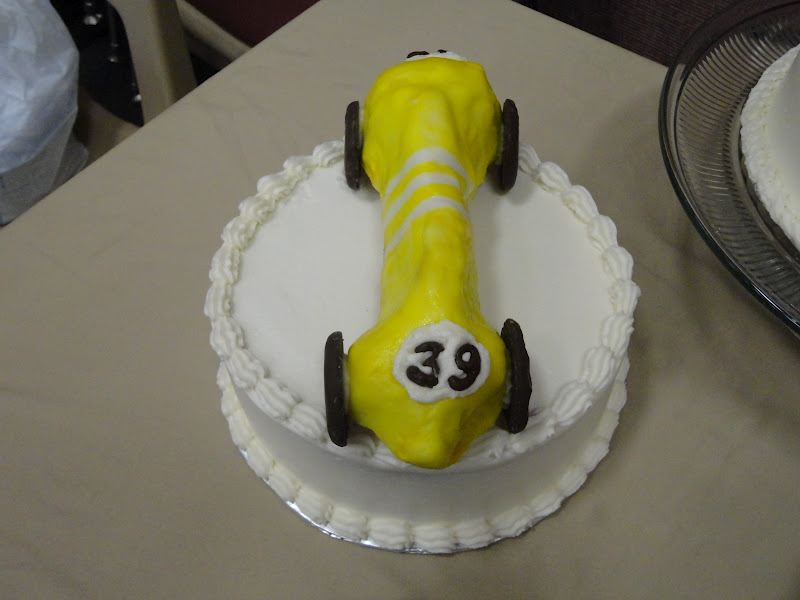
All cakes-8" vanilla round cake, buttercream frosting
Cars-Rice Krispies treats, rolled buttercream frosting, buttercream frosting, food coloring, melting chocolate, Oreo cookies, skewers for supports

Techniques Used-rope border, shell border, reverse shell border, painting

Focus-the CARS!!!

My husband is cub master and last month was the pinewood derby.  He asked me to do something that would feed 60 people.  The first idea that popped into my mind was making car models, but have them stacked like they do in the Olympics-first place is tallest and in the middle, then second and third follow on the sides.  I was going to make little trophies too, but we decided that it would probably be best if we just made car models, like you would see in a car show or dealership.  We didn't want the winners to think the prize was the car and/or the cake! 

While I was working on smoothing the cakes, my husband worked on shaping the cars with Rice Krispies treats.  Then he smoothed a thin layer of buttercream frosting to smooth out the Krispies and put them in the fridge, to let the buttercream harden a little before putting on the layer of rolled buttercream. 

My husband had to go to work so I took over.  I wanted the cars to have stripes, so I rolled out some of the left-over rolled buttercream, cut it into strips, and then placed them on the cars.  I then watered down a little bit of the food color gel and started painting.  Once I finished painting, I would then take off the strips and put them in the fridge.  The only complaint I had with this method was that the color never seemed to dry, so if they touched each other, the colors would rub off on each other.  With the little bit of rolled buttercream left-over, I think I will try kneading the color into it and see if the same thing occurs. 

 
Here are close-ups of each of the different cars:


As I mentioned before, the focus was on the cars, but I also had some borders that I wanted to focus on.  I wanted to see if I could do the reverse shell border as fast as the decorator in this video.  I'm happy to say that it was quite a success, although I think the other cake decorator still would pipe circles around me : ).  I wanted to show a close-up view of the border because I was so proud of how it turned out.


I also focused on the rope border.  Usually, top borders sit on top of the cake, and I think this border looks so much better coming from the side and ending on the top.  I don't know if you can tell with this picture, but the effect I was looking for worked.  I didn't really have a focus for the last cake, so it was mainly trying to make the shell look uniform (see yellow car pictures above).


The numbers were made from melting chocolate.  I strongly advise that you make extra numbers just in case they break.  Also, make sure that the numbers have some thickness to them or they will be more prone to break or melt in your hand.  What I did was trace the number on top of itself 2-4 times so it was at least 1/8" thick.  You don't want your numbers to be really flat.  This would work for thick or thin fonts.  One more thing, when choosing a font, rounder fonts are better than pointy or sharp edged fonts.  The wheels were Oreo Fudge Cremes cookies.  I was planning on getting chocolate filled Oreo cookies, but they didn't have them, so I used these ones instead.  Any chocolate cookie would work though.

These cakes were decorated March 2012.

Monday, March 12, 2012

Fleur de lis Cake


8" round yellow cake, buttercream frosting
Techniques Used-Fleur de lis, rope border, rosettes, reverse shell
Focus-side garlands, using one tip
I saw this one video on how to measure out the side garlands and I wanted to try it out.  He took a plastic cup and made an imprint on the sides.  He was a little bit sloppy with his piping, but I still liked his idea and thought I would try it out.  For my imprint, I used tip 789 (as seen below).  I wasn't sure if they would be evenly spaced, so I first made an imprint on north and south, then roughly checked to see how many would fit in between.  There was enough room to have 12 imprints altogether, so I then proceeded to make an imprint on east and west, and then two between each. 
Here are some pictures of the imprints before the piping.  This made piping the rope border very easy and look really nice because I wasn't having to eyeball it while in the process. 
I also used the same method for the top of the cake.  I don't think it would've turned out as nicely if I tried to eyeball a perfect circle.
Lastly, I thought you would like to see close-ups of the different techniques.  When learning a technique, it's nice to have as many pictures and examples as possible. 

Rope garland with rosettes, reverse shell borders

Rosettes

Top view of reverse shell border

This cake was decorated September 2011.

Thursday, August 11, 2011

Independence Day Treats

Rice Krispies treats cut with cookie cutters, buttercream frosting

Focus-having fun trying out different borders and techniques

I was itching to decorate something and I thought it would be fun to decorate rice krispies treats for Independence Day.  For one thing, rice krispies treats are easy to make and clean up, and they also can be cut with cookie cutters pretty easily.  I used plastic cookie cutters, but any kind will most likely work.  I wanted to try out a few different borders and things so I will list the techniques used with each picture.


Red, White and Blue Basketweave Star

Techniques Used-basketweave

There isn't much to say about the star except that I think it turned out nicely.  I would've used a star tip for the red if I had one available, but it still looks good using a round tip.  I didn't use a basketweave tip for this star.


Blue Firework and White Star

Techniques Used-star, dot, E-motion border

For the Fireworks, I used one tip only.  To get the different sizes of stars, I changed the pressure.  Next time, I will try to just do one size to see what effect that gives.  By the way, I think the cookie cutter shape may be called "Blue Ribbon."  It wasn't part of the Independence Day set.  For the star, I did an E-motion border in white and then added blue and red stars for color. 


Braided Star

Techniques Used-star, braid, Fleur de lis

This was the one I was most excited to try, the reason being that I wanted to try out the braid as a border.  I hadn't seen that in any of my decorating books, so thought it might not be a common border.  I'm glad with how it turned out.  The Fleur de lis is in the middle.   To make a Fleur de lis, you start with a shell down the middle.  Then you do a reverse shell on both sides of the shell.  Pretty simple, yet elegant. 


Reverse Shell and White Flower Star

Techniques Used-reverse shell border, star flower

I like the look of the reverse shell, but I think the hardest part for me is remembering which way to go.  I saw a YouTube video where the decorator was doing it really fast, and I thought I would try to do it fast too.  It didn't work out in certain areas, but she did an amazing job on her cake.


United States Flag, White Stars

Techniques Used-star, dot, writing, Fleur de lis

Next time, I think I will spread red frosting and then pipe white stripes.  These didn't turn out as well as I would've liked.  Part of it was that the rice krispies treats formed to the plate after, so the flagpole was originally straight.  Also, I was piping the red frosting the way I would for writing (slightly above the treat) when I needed to pipe directly onto the treat.  Live and learn, right?  The two white stars are just a bunch of stars and then dots on the corners. 


Cowboy boots, Red and Blue Stars

Techniques Used-piping, star, dot, shell

The cowboy boots were fun to do.  I learned from the flag that I needed to pipe closer to the treat than with writing.  Also, when I cut out the boots, I used the same cutter, but flipped it over to make the second shoe.  Both stars use shells.  The difference is that the red one uses two little shells for each point, while the blue one uses one. 


Braided Cowboy Hat, Blue Star, Fireworks

Techniques Used-braid border, star, zigzag/shell border, dot

I thought the braid would look good on a hat, plus I wanted to try the braid border again.  The blue star is something I thought I saw on a video, but I can't find the video anymore.  It's just a shell with a slight side-to-side movement.  I think it had a nice effect, adding texture to a simple star.


Another USA Flag, Rope Border Cowboy Hat

Techniques Used-rope border, star, writing, dot

I've already discussed how to make these, but I thought you would like a closer picture of these as well.  I think this flag looks much better, even with the bent flagpole.

These Rice Krispies Treats were decorated July 2011.

Friday, June 17, 2011

Sweet Pea Cake


8" round yellow cake, buttercream frosting

Techniques Used-sweet pea flower, shell border, leaves

Focus-sweet pea border

In one of my Wilton books, there is this cake that uses the sweet pea flower for the borders as well as on the sides.  Although this is nothing like the picture in the book, I wanted to try out the sweet pea border.  I chose to do this cake because I only wanted to use one batch of frosting (3 cups).  This flower uses very little frosting, covers quite a bit of space, and makes a unique border. 


Since I was trying to stay within 3 cups of frosting, I had to determine the colors I wanted beforehand.  First off, having the cake frosted white meant that whatever frosting was left over could be used for the design.  I didn't measure it, but I think there was 1/2-3/4 cups of frosting left over.  (On a side note, I didn't fill as much between the layers as I normally do, so a good estimate for frosting an 8"x4" round is 2 1/2-3 cups of frosting.)  Secondly, with the flowers being blue, I could add yellow to the frosting once I was done with piping the flowers or vice versa.  I was able to make my goal and had about 1/4-3/8 cups of frosting to spare.

This cake was decorated June 2011.

Wednesday, June 15, 2011

Majestic Roses II


8" round chocolate cake, buttercream and chocolate buttercream frosting, peanut butter fudge filling

Techniques Used-Wilton rose, shell border, leaves

I've done this cake before, but this one is slightly different.  There are two roses in the middle this time, and I used tip 47 for the shell border, instead of the usual tip 21.  I did this because I use that tip for the vertical chocolate lines and I thought it would add uniformity to use the same tip.  I learned with this cake that frosting consistency really matters.  For example, the roses call for stiff consistency, but if it's too stiff (which is my tendency) then the edges of the petals won't be smooth, and they also take longer to pipe out the frosting.  I used to think that roses were a pain because of how long they took.  I think this time I made 20 in about 70 minutes, which I know isn't as fast as professionals, but it's much faster than what I was doing before.

This cake was decorated May 2011.

Friday, March 11, 2011

Treble Clef and Bass Clef Cakes

Left Cake-8" round chocolate cake, chocolate buttercream frosting, powdered sugar
Right Cake-8" round white cake, buttercream frosting, cinnamon


Techniques Used-Basketweave, Shell Border, Stencil

Focus-Stencil

Stenciling cakes is one fairly easy way to spice up a cake.  It can be really intricately patterned or one big icon (as above).  I know Wilton and other cake decorating companies have different stencils, and I figure you can probably buy regular stencils as long as they haven't been used for other things and are cleaned.  The ones above of the treble clef and bass clef aren't store bought, and you may be hard pressed to find them.  I will let you know how I made these after I explain stenciling.

Stenciling Materials-stencil; fine mesh sieve; powdered sugar, cocoa powder, or spice (left cake has powdered sugar, right cake has cinnamon)

Stenciling-I recommend waiting to put on your top border until after you've stenciled your design.  It is possible (but harder) to stencil after the border is on there.  I also recommend practicing on another surface before trying the cake, especially if this is your first time.
1.  Lightly place the stencil where desired, making sure it isn't going to move.  Be sure to wait until the frosting is slightly dry (put it in the fridge for 20 minutes or so), otherwise the frosting will stick to the stencil.
2.  Hold your fine mesh sieve directly above the stencil anywhere between 4 and 12 inches from the cake.  Pour a little bit of powdered sugar (or whatever you're using) into the sieve and shake the sieve up and down lightly (a light bouncing movement).  Don't worry about the sugar "leaking" under the stencil; as long your stencil is flat to the cake and you're shaking up and down instead of side to side, the sugar will just fall straight down.  Repeat this until you have a fairly thick and even layer of sugar.  
3.  Lift the stencil very carefully and evenly.  Try and lift as smoothly as possible to avoid sugar from falling onto the cake.  You're done!

Making Your Own Stencil

Materials-Xacto knife, manila folder (or something hard and can easily be cut), pen

1.  Draw design on Manila folder.  As you are drawing it, try to imagine where the holes will be to make sure that you don't accidentally cut off inner portions of your design.  For example, on the treble clef (left cake), there is a little break on the top portion so that the inner circle wouldn't get cut off later.  Also, the straight line going down the right side wouldn't normally have little breaks either.

2.  Use the Xacto knife and carefully cut the folder.  Once that's done, you can start stenciling on the cake!

These cakes were decorated May 2010.

Thursday, February 24, 2011

Piano Cake


9"x13" vanilla cake, buttercream frosting, mini Kit Kat Bars

Techniques Used-shell border, star border, bead border

Focus-piano keys, music note border

This was a fun cake to do.  It was frustrating at first, because I had some technical difficulties, but otherwise, it went well.  What happened was that I planned on using white Kit Kat bars for the white piano keys, but I couldn't find them anywhere!!!  I went to all the stores I could think of, and no one sold them.  What's funny is that now I can find them everywhere, but at the time I was apparently looking in the wrong places (like Walmart?).  Anyway, I ended up using some of the remaining cake and frosting it white, and then making indentions with a toothpick.  I'm sort of glad I couldn't find the white Kit Kat bars, because I think the white keys look better this way.

Piano Keys Materials-cake, toothpick, mini Kit Kat bars or similar candy

Piano Keys Directions-Before you start, look at real piano keys or pictures of piano keys.  Notice that the black keys and white keys are different widths.  Also, most of the black keys aren't centered over two white keys.

Decide how many keys you want; I will use the numbers from the cake above, so it will be less confusing, so there are 14 white keys.  The next step will be to lightly imprint the "edges" of the keys.  You will take a toothpick and evenly divide the white portion into 14 keys.  I suggest that you make a small mark on the corner first for each key, and then when you've determined that all keys are the same size, then make a line on the top and front side. 

Get the Kit Kat bars and break the pairs apart.  Cut all of the Kit Kat bars about 1/4-1/3 from the end.  Choose a slightly longer size than what looks good to you, for you will stick some of the Kit Kat bar into the side of the cake.  Also, notice where the words "Kit Kat" are on each bar, and try not to have them on the bigger piece, or at least have it on the end that will go into the cake.  Place the Kit Kat bars by pressing them slightly into the side of the cake.

Music Note Border Materials-same sized star and round tip (I used tips 21 and 12), two colors of frosting, small round tip (I used tip 5)

Music Note Border Directions-Use two different colors of frosting so that the music notes stand out more.  I will use the tip numbers above, again, to make it less confusing.  The white frosting will be for tip 21, the blue frosting for tips 12 and 5.  You will do a tip 21 shell border, but use tip 12 for every third shell.  Once completed, make vertical lines (about 1 1/2" tall) with tip 5, starting from the right side of each round shell.  Then pipe the flag of the music note on each.  Note (no pun intended):  If you don't pipe the flag, that's a quarter note.  Another note (again, no pun intended): instead of using a flag, you can make two-eighth notes by omitting the flag and piping a horizontal line to connect two notes, or two horizontal lines to make sixteenth notes.  Have fun with it! 

This cake was decorated November 2009.

Saturday, October 30, 2010

Roses, Flowers, and Dots Cake


8" round vanilla cake, buttercream frosting, blackberry filling

Techniques Used-Wilton rose, swirl star flower, dots, leaves, shell border

Focus-brush striping

I've always loved the two-tone flowers.  I thought blue would be such a neat color, because it's a color rarely seen in nature, and I wanted a lot of contrast with the white.  Also, I wanted to use a color that tasted good, so red and purple were out of the question.  By the way, there is a shell border underneath the swirl star flowers and leaves, so that they would have something to attach onto.  One more thing, the leftover frosting I had from the roses, I used on the cake, because I made the roses a couple of days ahead, so I mixed the remaining frosting with other white frosting to make this blue color, so there was very little frosting wasted. 

Brush Striping Materials-small brush (used only for food), food gel, frosting, disposable bag, tip

Brush Striping Directions-I'm not really going to go into directions, because I think Wilton does a good enough job and they have pictures of what they're doing.  You can probably find a video on the Internet as well.  However, I will give you some of my tips:
-Use more food gel than you think you need. 
-for roses, make sure the second color is aiming for the pointed part of the tip.
-Do practice roses without the second color.  Once you feel comfortable with making roses, then add the second color.

This cake was decorated May 2009.

Sunday, October 24, 2010

Majestic Roses Cake


9" chocolate round cake, buttercream and chocolate buttercream frosting

Techniques Used-Wilton rose, leaves, shell border

I got this cake design from my Wilton Cake Decorating Course 1 book, but unfortunately, I believe it is out of print.  The original design was exactly like this except for one thing-everything was white.  I decided to go with chocolate on white because I thought this same design would look good with the contrast.

This cake was decorated March 2009.