Welcome!!!

As my blog name suggests, this blog will be like a learning journal. I won't go step by step on each dessert on what to do, but instead focus on the technique(s) I was learning and what I discovered while in the process of making it. I hope you will learn a thing or two, or if anything, use this as a reference and get ideas for your dessert-making. Happy decorating!
Showing posts with label fruit. Show all posts

Monday, March 12, 2012

Flower Lattice Apple Pie

9" apple pie, pie crust flower

Techniques Used-lattice top, fondant/gum paste Lily

Focus-making fondant/gum paste Lily out of pie crust
 
 
I wanted to know if the flowers made with fondant or gum paste could also be made with pie crust.  I think the hardest part about it was making a form for the oven.  There are plastic formers out there made by Wilton and other companies, but I needed to bake the flower, and the former wouldn't be able to handle the heat.  All I did was take a strip of aluminum foil and mold and shape it to be a ring the size I wanted.  I didn't take a picture of it, but you can see it underneath the flower.

I cut out six petals; they look like stretched tear drops.  I then thinned out the edges of the petals to make them look more realistic (this also makes the edges brown slightly for a neat effect).  Here's a video of how I thinned the edges, although the video is about making an anemone.  I then made a line on each petal using a veining tool.  Next I started placing the petals.  As you can see, there are two layers of three petals, so I just divided the ring in thirds for the bottom layer, and then placed the next layer of petals in the spaces.  I didn't want the tips of the petals to just droop down, so I made aluminum foil balls to lift them.  The picture above shows some of the petals pointing upward.  Then it's just baking it and placing it on your pie. 

I wanted to show you the pie without the flower.  I really like this design, how it gives the pie some texture without adding more pie crust.  If anything, there is less pie crust, or at least that's how I do it.  I like the strips to be fairly separated, but the strips can vary by size and distance between them. 
 
 
For those of you that want to learn this technique, I found some videos and written instructions for you to follow.  This first video is the way that I do it, except my pie recipe doesn't require egg whites.  Here are written instructions with pictures as well.  I also wanted to show this video, because it's another way to do the lattice top, so you can choose which way you prefer.  I also like it that he cuts his own strips without using a ruler, and they look really nice. 
 
 
Here are some more ideas for the tops of pies.  This first site shows a few different borders as well as the lattice top.  The second site is more focused on borders, but also shows pie pops, which are pies on a stick.  I hope this has gotten your creative juices flowing, or at least gotten you to crave some pie!
 
 
This pie was decorated January 2012.

Thursday, February 24, 2011

Grapevine Cake


7 1/2" oval spice cake, buttercream frosting, apple cinnamon filling

Techniques Used-grapes, vines, leaf borders

Focus-casual frosting coat, grapes, vines,

I found this idea in my Wilton Cake Course 1 book, but it's no longer available. 

I was interested in learning how to frost the cake so that it had slight waves in it.  It was harder than I thought.  I found out that I needed to put more frosting on than usual (I tend to make thin coats).  It was a good experience, and maybe I will do that again.  Here's a picture below of the cake with a wavy coat.


I learned with the vines that I had a hard time doing them free hand.  I ended up taking a toothpick and imprinting the design first.  I think I should've added more vines or grapes, but it was good practice.  Unfortunately, I don't have a picture of just the vines.

The grapes were easier than I thought.  I learned that at the top of the clump, try to put 2 or 3 grapes in the first row instead of 1 grape.  Then I just made each row bigger by one and then smaller more gradually towards the bottom.  Then to add some volume, I added smaller rows of grapes on top of the ones I already made.  Then three leaves are added at the top.  Grapes are time consuming, but not difficult.  Here is one grape cluster up close.

This cake was decorated April 2009.

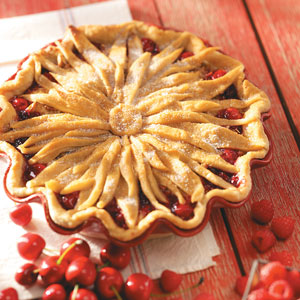
Flower Pie


 I discovered this neat idea when I was trying to find pie crust cutters on the internet.  I searched on Google images, and the second picture above is what I discovered.  The first picture is what I concocted, but I think I would do a few things differently the next time I try this.  For one thing, only use thin strips on top, and another thing, have a smaller center.  If you would like to see this and other yummy treats she's made, visit
 
This pie was decorated January 2011.

Sunday, October 24, 2010

Strawberry Basketweave Cake


8" round vanilla cake, buttercream frosting, strawberries

Techniques Used-basketweave, rope border

I've wanted to make this cake for a long time.  I like how it looks like you have a full basket of fruit!  The nice thing about doing a basketweave border is that you don't have to worry about smoothing the cake.  The basketweave is such a nice design too.  You can change tips, use different colors, have different borders, etc.  Really, you can make the basketweave design as simple or complex as you want. 

This cake was decorated August 2009.